Showing posts with label DIY Projects. Show all posts

Friday, December 21, 2012

DIY Christmas Card Wreath

If you are like most people, you get lots of Christmas cards in the mail and run out of spaces to put them pretty quickly. There are a lot of cute ideas out there, and I decided to try this one this year for my mom. I saw a version of it on Pinterest.

What I used:
 I think this totaled around $10
I made a bow using dollar store ribbon, added some retro Target ornaments, and tied it to the hoop. Then I just used clothes pins to attach the cards. So simple!


Such an easy and fun way to display your Season's greetings!

Sunday, August 19, 2012

Adding Custom Touches to Basic Bedding

For my parents' new guest bedroom, I had picked up some basic white pillow cases since they would be seen a little behind the shams. I decided to spruce them up a little to give them a more custom look.
I had these pretty tie-backs that came with the living room drapes that I knew we wouldn't use, and they were the perfect size!

See how they turned out HERE!

Thursday, August 16, 2012

Dropcloths: A solution for inexpensive drapes

I purchased a dropcloth a little while back to possibly use as some kind of window treatment at my parents' house after looking at the one currently on my bathroom floor (being used as an actual drop cloth) and realizing what a great thickness and natural look it had!
Then I started seeing them used other places by actual designers:


Jenny from Little Green Notebook rounded up a lot more of these pics for BHG...you can see them all HERE.

Then I saw some in person at a friend's house and they looked great! So I thought we could give it a try. This is a VERY in-progress pic, but you get the idea:
I re-used an old brass rod that I painted oil-rubbed bronze, and then picked up some ORB clip rings at Walmart. I had to hem the drapes since they are 10 ft by 6 ft, but they are a great width for the windows and are nice and thick. And for only $10 a pop, a great deal!
See some more in-progress pics of this room HERE.

Wednesday, August 15, 2012

Vintage Magazines = Instant Art

Vintage Magazines have such amazing colors and artwork. My grandmother had saved several from the 30's. Although we didn't know why she had saved them, they must have meant something to her, otherwise she would have tossed them long ago.
So what do you do with something like this that you know was important to her? Treat it as a piece of art!

I used inexpensive document frames from Walmart and just left the cardboard backing off. How great are these? They even still have the postage marks from when they were mailed to her!

Other items that we used for creative art: old sheet music. Oma was a piano teacher for many years, and she has an awesome collection of music that is in great shape. What better way to honor that part of her life than to feature some of it in the room!
This room has undergone a lot of changes. To see the process so far, check out THIS post with lots more pictures!

Monday, August 13, 2012

Freshening Up A Vintage Sofa

People are starting to realize the value of a good, sturdy sofa. Because of this there has also been a re-emergence of the printed fabrics that you saw in many of those sofas from the 50's, 60's, and 70's. The key to using these is to update them with fresh fabrics and accessories. A few examples:


We had my grandmother's vintage printed couch to work with:
See what difference the other side of the room and some custom pillows made HERE!


Thursday, August 9, 2012

Backing Shelves with Fabric

This old secretary needed some brightening up...

But we didn't want to actually make any permanent changes to the antique piece. So the solution: fabric!
HERE is the full post on how I did it!

Tuesday, August 7, 2012

Inexpensive Pillow Form

How cute are these little lumbar pillows for my mom's side chairs?

Check out my secret for a super-inexpensive pillow form that gives great support HERE!

Also, if you are wondering how I make most of my pillows, THIS is a great tutorial. You may remember my original post about it HERE. It's a great way to cover a pillow without a zipper but still enabling you to wash it if needed!

Monday, August 6, 2012

Dresser in Distress

While helping my parents with their house, I worked on a dresser that was in need of lots of help.  I thought you might enjoy seeing the transformation! Here is a pic of it before I started (after I took the pulls off).

Since I'm too lazy to repost the whole thing here, you can see the full post with lots of "after" shots here: HERE

Friday, August 3, 2012

I've Been a Busy Bee

Happy Friday! I have been back home again working on my parents soon-to-be new house. I spent last night loading lots of pics for blog posts on the site where I am keeping track of all of that. If you would like you can see it all here: www.opashouse.blogspot.com

Here are a few looks at projects that will show up there in the next couple weeks!


Tuesday, May 29, 2012

Master Bathroom/Closet: Latest Updates

The closet is starting to look more like, well, a closet. Here are a couple of pics.
From the last POST, just the base:
And here it is currently...with areas sectioned off. Straight ahead will be a shoe rack, with hanging areas on the left and right.
Here is another before pic:
A similar view now...this gives you a better idea of the layout.
The left and right sections will be for hanging, while the middle will be drawers/shelves. There is one more section on the right for hanging that wouldn't fit in the picture. I have created a special "Master Bath/Closet Project" label, so you can see all of these posts in one spot. Find it under the "labels" section on the right side bar!

Sunday, May 20, 2012

Monogram Tray DIY!

Last week, I had the honor of guest posting about my latest DIY project for Inside My Present. I thought I would share that project here for those of you who missed that post...

What I used:
A wooden tray from my closet
Acrylic paint/brush (already had)
A stencil from my craft drawer
Painters tape (already had)
A plastic cup (from my kitchen cabinet :)
 This lady had been sitting in the closet for oh, 5 or so years, and it was time I did something about it.
I decided to paint the inside of the tray to give it an updated look. I wanted to personalize it as a gift to someone, so I dug through my craft collection and got busy.
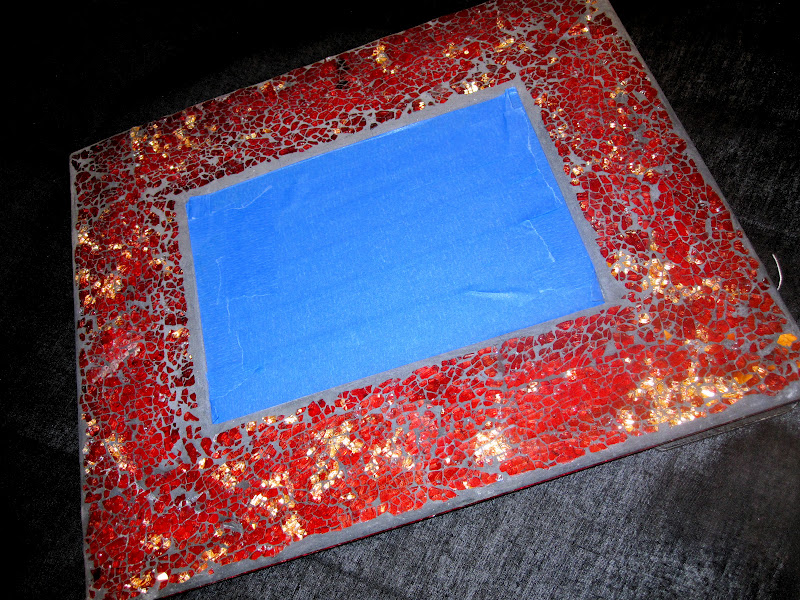
First, I taped it off and gave it a spray-paint primer coat. Once that was dry, I went back over it with acrylic paint to make sure the old image was gone. 
I love the bamboo look right now, so I decided to paint a bamboo-type pattern in gray, as kind of a tone on tone effect. I didn't want anything too bold for the print. Then I used a plastic cup to trace a circle in the center.
I did all of the painting by hand with no measuring (because I'm impatient) so it's not perfect, but lets just say that adds to the charm, Ok? :) I chose a bold tangerine for the center so that the monogram would pop.
Once everything was dry, I used a stencil that I already had and centered it on the dot. I used the white paint again to really make it stand out.
Tip: Try to remove painters tape when your paint is still a little tacky for nice lines. As for the stencil, I like to remove it immediately for the best results.
Now, for a quick reminder:
And here is the finished product! About an hour and a half total time spent, all with things I had on-hand!
Although I'm giving it as a gift, I thought I would do a little "staging" to give you an idea of how to use this easy and personlized piece!
I can just see some yummy cheeses displayed on it to pair with a nice wine!
 Fresh flowers always make everything better!
I hope you enjoyed my little project today and that it inspired you to get crackin' on some of those things collecting dust in your closet!
If you love tray makeovers, check out the herringbone tray that I painted earlier this year HERE.

Also feel free to grab my button for your blog and stop by often to see more fun projects like this!

MidSouth Stagers
 

Saturday, May 12, 2012

Guest Poster: Lauren from Inside My Present shares a fun DIY project!

I'm so excited about today's post because it is a part of Trading Blogs over at  Serendipity and Spice! Check out Inside My Present today to see my post as well!

Let me introduce myself, my name is Lauren (coincidence, I know!) and I write a little blog called Inside My Present. It's all about cooking, eating, home and garden and anything else I get myself into- truly a glimpse into my present! I am so happy to be appearing on such a chic blog as part of Trading Blogs- Lauren has already got me yearning to pick up a paint brush and hit the thrift store!

Today I'm going to share with you a craft with endless possibilities- beautiful fabric-covered picture frames. A great solution for your thrifty finds and those remnant fabrics, you can take any drab frame and customize it to match your decor or the theme of your photo. A custom frame also makes a great gift! This one is for my mother for Mother's Day- shh... don't tell!
This project started with this frame that just wasn't my style. I wanted to refinish it somehow to blend with mom's decor- paint wasn't an option on the frame's mosaic surface but fabric choices were endless.  I found a beautiful pewter fabric and some coordinating accents and got to work.

Unfortunately, you couldn't disassemble this particular frame so I used painter's tape to protect the glass before spraying the front of the frame with spray adhesive. The spray adhesive worked perfectly for this project- it didn't discolor the fabric or show any lumps or bumps below.
I used an exacto knife to cut out the fabric covering the glass, making sure the edges were adhered well,  and used fabric glue to glue the fabric to the back of the frame.
Depending on the look you want, you could be done at this step! If you have some fabrics you want to showcase, they would look great unadorned and perhaps grouped together on a table. Or you could use some fabric glue to add accents of a coordinating fabric. 
You can decorate your frame with anything your glue will stick to! Have some mementos from your latest vacation? Showcase them on your frame with a photo from the trip. Use your collection of old keys, buttons or broaches- anything! I decided to decorate mine with these pretty fabric flowers I had made and some ribbon- you can read how to make the flowers here
I have a ton of nicked up frames I'm looking forward to refinishing- I'm thinking a groups of burlap-covered frames would look great! 

I hope you have enjoyed reading- thanks to Lauren for trading places with me!


How cute and creative is this project?! I love it! Make sure to hop on over to Lauren's blog to see what else she has been up to!

Tuesday, May 8, 2012

Master Bathroom Progress Report

A couple of weeks ago I shared this picture along with some more master bathroom updates. You can see more info on this ongoing project HERE and HERE.
The master closet is the second part of this project and you can't see it, but there is a door to the right when you walk in the bathroom that leads to it...
It was originally a small closet with sliding double doors. You can see where the old wall was where the floor has been repaired.
This base that goes all the way around the room is going to be wall to ceiling built-ins to house hanging clothes, shoe racks,and drawers.
But let's step back to show you exactly where this is:
This view is looking into the bathroom (on the left) and the closet (on the right) from the master bedroom...before the drywall was up.
If you step into the closet, you can see where it used to be a closet/hallway combo, with the hallway looking into the Great room. That trim around the door is where the closet started. Right along that far right blue line.
And now the door is closed up, floors are patched (and will be re-stained), and the bases are built! This has pretty much doubled the size of the closet. And in case you are confused by this view, the bathroom door is just out of sight to the left.

Like I said in the last post, I will continue to update you on the master bath/closet as it progresses!
See you back for "Thrifted Thursday"!
Related Posts Plugin for WordPress, Blogger...