


 Here she is in my dining room about a year ago. Alot has changed in this room...the lion print is now on the far right back wall, my plate rack on the right. I have a rug under the table as well. But you get the idea. So I need something round again but with a leaf, and more sturdy/solid looking than this. I love THIS table from Pottery Barn, but I don't love the price. So when garage sale shopping with my mom this summer, she spotted a table with LOTS of potential and we immediately ran to claim it. Better yet, it was only $10!! Yes, you read that right. $10. I couldn't believe it. The finish wasn't what I was looking for, but that can be fixed. So we took it home and it has been patiently waiting in my garage.
 I didn't get an original "before" pic, but this is after sanding. You can kind of see the original finish still on the side of the middle leaf. It will sit in the dining room without the leaf, but this shows it at its full size.
 Check out those amazing feet!!! This piece is pretty old and the wood is solid. I still can't believe the price!! We are going to stain it in a deep, rich brown and then I am going to find some chairs once I see the final color. I can't wait! As soon as it is complete, I will share the pics with you.
 This is the table how I found it. Half original finish, half red spray paint. Obviously this was the middle of summer based on the badly-needing-a-good-mow lawn.
 And suprise, when we tried to pick it up and it was super heavy, we found a sewing machine inside! Isn't that cute? And the front opens up and has a tray to hold sewing accessories I guess. We removed the really old sewing machine, since I didn't have a need for it, and decided to paint it.
 It is a pretty old piece. The stamp underneath says Sept 1, 1967.
 We used my Sherwin Williams color wheel and picked a color a little out of our comfort zone. After numerous color mistakes made in our first home which called for numerous hours re-painting, we were a little gun-shy about painting an actual color (as opposed to my go-to colors of black, brown, gold, and white). But I wanted to bring in a color from other places in the house, and yellow is something that I am starting to put everywhere. So my husband picked the color, and we bought a quart. It is called "Quilt Gold" and we used oil based to get a more finished look.
 Two coats later it is hanging out next to my bed finally happy to be out of the cold garage! It is the PERFECT height and after paint was about $15 start to finish! That's hard to find.
  You can see me already bringing in my left over drapery fabric to maybe create some throw pillows for the bed. I will have to wait though until I know what the rest of the changes in the room will be. I can't wait to go to bed tonight and read from a lamp that isn't sitting on five books and a mini night stand!!
 Mr. Henry Cavill, who plays Charles, The Duke of Suffolk. Ok, maybe not the only reason, but a very good reason.
 Showtime also got together with Metropolitan Home to create some rooms inspired by the series!
 I absolutely love this couch and the stencilled walls.
 This is a 17th century chair that has been brought back to life and looks beautiful up against the light walls.
 Here is the full view of the room. It just makes you feel like you are a part of that period (minus the beheadings and diseases). You can read about the designer and see more pictures HERE. I love pulling ideas from period decor. Just one unique piece can be a total standout in a home!
 Here it is after sitting in my garage for a few weeks. I think it originally sat long-ways above a dresser. I am using it vertically.
 My plan was to re-paint it the same way that I painted the picture frame above my couch that I showed you HERE. I stuck paper in all of the edges to protect the mirror, and then I sprayed a layer of black paint. When that was dry, I came back and lightly sprayed gold paint over the black section by section, using a small brush to spread the gold as I went along.
  Here is the mirror all spruced up and at home above the linen press! I still need a couple of accessories to go in between the lamps, but I will figure those out later. I am so happy with the size and shape! For a more casual look I could have kept it black or painted it a clean white, but I wanted it to look a little more formal and sophisticated in this space.
 I also love how it reflects our built-ins and adds some color and light to that wall. For a total of $30 (because I already had the spray paint), I got a huge mirror that would have cost hundreds had I bought it from a retailer. I think that's a steal!
  Here is a before picture of a living room I recently staged. The angle is OK but without a wide angle lense, it is really hard to see the true size of the room. Also, the rug and other items in the room are pretty dated and the buyers in this area are young couples looking for their first home.
 Here is an after shot with a wide angle lense by a professional photographer. It is from the other corner of the room, but you get the idea. We added some easy updates (new rug and side chair from Overstock.com, coffee table from Target, and art from Garden Ridge) and it's like a new room! We also opened the curtains to bring in the natural light, as well as removed the door to the den off of the dining room. This helps give the house a more open floor plan and better flow, which is what buyers are looking for these days. The house was listed using the first picture and was on the market for quite some time without selling. After staging and new pics, it sold in a couple of months in a terrible market!
 This is a before shot with a regular camera of a den area. It is really hard to tell how much furniture can really fit in the room. You would easily pass it up when browsing listings online.
 Here is the after with the professional wide angle. We didn't over-do the furniture, but gave it enough to show how much room there really is. We also covered up the ugly wires from a previous TV setup with a mirror from the bedroom dresser! It was the perfect size.
 This is a before of the master. Boring. And hard to tell how large it really is.
 Here is the after. With just a king sized bed, side table, and dresser it is a whole new room!
 Here is the main living room. It is a huge space and we just wanted to showcase its potential with a few key pieces.
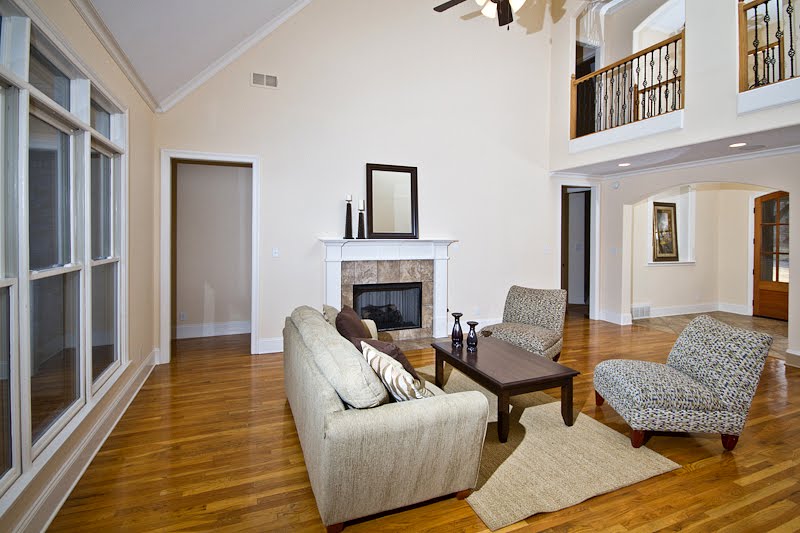 Here is the after with furniture. Doesn't it feel so much cozier and inviting than before!
 This is a before of that room from another angle.
 And here is the view when you walk in the home now. We didn't over-saturate the room with furniture and accessories, but filled it with enough to make it feel like a home.