Friday, July 22, 2011

Bringing My Stairs From Drab To Fab

My great room has two sets of stairs leading into it because it is not on the same level with the rest of my house.  The stairs have always been pretty ugly.  They were stained when the rest of the floors were put in, but they only stained the tops, not the sides.  They also have these really ugly granny rails that are kind of a dirty white color.  Sounds fabulous, right?
Well I decided to do something about them (after two years of ignoring them), but I need my DIYer card taken away because I forgot to take before pictures!!  What was I thinking?  Sometimes I just start something on a whim and get caught up in the moment :)
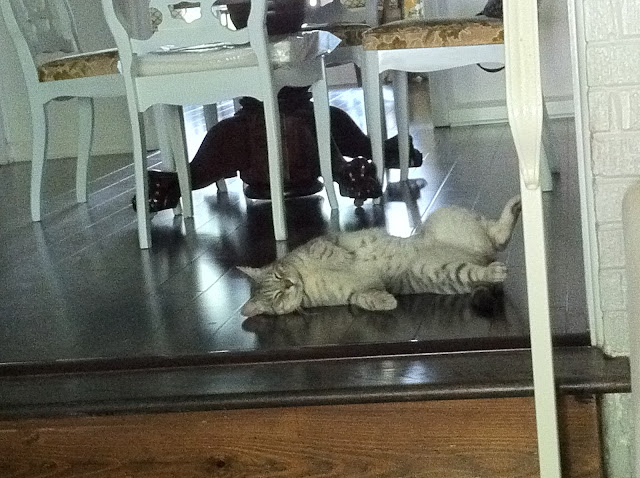
I did, however, find this picture of the stairs.  Ok, so really it's my cat being really cute but it also captured part of the stairs so you can see how they looked. Please ignore the in-progress chairs in the background. Oh, and the lazy cat.
Yes, this is how he sleeps...and if he is in your way, just step over...he won't move. 
Here is a pic I snapped after I attacked them with some paint.
I used left over trim paint to take care of the fronts, and black paint for the granny rail, which was left over from painting my back door black (which I haven't showed you yet).  I was afraid the black might make the rail stand out, but it actually kind of blends and brings a new sophistication to the stairs.
This is the best pic I could find of the other set of stairs...you might remember them from THIS Christmas post. 
Here they are now (from a different angle).  I gave them the same treatment, and they look SO MUCH BETTER.  Why didn't I do this sooner?? I also finally painted the door, which was just the off-white stock color before.
Ok, I know stairs aren't the most exciting thing in the world, but I wanted to show you how such a small change can really help out a space.  And the best part about the whole project: it was FREE!  Everything I used I had already.  I love it when that happens!!
Here is one last pic of my happy stairs.  Aaaand, I just realized there's a load of laundry on the couch. Sorry about that. Keepin' it real with this post.
Anyway, like I said, if you walked in the house, you would probably just assume they had always been that way, which is the point!  Everyone have a happy Friday!

Wednesday, July 13, 2011

Dining Table and Chairs Before and After!

My dining room table and chairs are finally finished!  It took me a long time to decide on a fabric, and at first I thought I was going to actually sew all of the cushions.  I pretty quickly realized that I was going to take the easy way out...staple gun+fabric=easy way to cover cushions.  And I am SO glad that I did!  It was really easy and looks great!
Just to remind you of where I started, here is my old table and chair combo (from college):
And here is my new table when I started($10 from a garage sale):
Here is my dining room now!!
Here is another view.  I decided to go with a print for the fabric but something neutral since the chairs will probably be used in different rooms for parties or when a lot of people are over.
Here is what the chairs looked like when I got them.  I used a spray paint primer followed by a coat of white spray paint (you can see them in-progess HERE).  It worked perfectly and I didn't have to worry about brush strokes!
Here is the after.  I love them!
And yes, there is a lot of stuff in my living room that's not normally there...having floors re-finished will kind of turn your house upside-down.
I literally just used our heavy-duty staple gun and stapled the new fabric right over the old.  I was worried that you could see through it, but you can't at all.  This made my life so much easier!  If you do this with a print, just make sure that your fabric lines up so that it's not crooked!
These pillows probably won't stay, but they needed a temporary home, and I like them with the green hydrangeas from my yard!
I like how you can see the fabric from the back too.  I think this room has so much character now!  The fabric was $9 a yard from Premier and I used 2 yards.  So $18 for the cushions.  Not bad!


beforeAndAfterButton

Friday, July 1, 2011

What does your front door say about you?

I had the opportunity to take a quick trip to NYC last weekend for a friend's wedding, and also to see my fabulous friend Alexis, who has recently become a New Yorker(and is worse at consistent blogging than I am :).  While walking around the West Village on Saturday, I realized that everyone had amazing front doors!  Then I realized why...because every town house looks almost identical, and the door is really the only way to make a statement.  I should have been snapping pictures of all of them, but I felt a little stalker-ish, so I just got a few.  I think after my 100th "look how cute that door is!", Alexis was ready to strangle me:
I love this beautiful wood color and the round knocker!  I noticed that a lot of the doors are very skinny and tall, but all of them had beautiful frames.
The blue adds so much character!  There were so many great colors!!
This is not a picture that I took, but is another West Village door. How awesome is the detailed moulding on the door!  And I must say these doors are definitely bringin' brassy back (feel free to sing that like Justin Timberlake).
This one takes the details from the red door ones step further with a floral carving.  Look how much character it has!  I would love to see inside all of these homes because I'm sure there is just as much character on the inside!! Making your front door a statement piece is definitely an easy and inexpensive way to spruce up your home.  Even if you don't live in the "big city", that doesn't mean you house's exterior can't have big city charm!!
Related Posts Plugin for WordPress, Blogger...