Monday, January 16, 2012

Before and After: A Quick Look At A Client's Living Room

When my clients moved into their beautiful new house, they didn't exactly have furniture that worked in the space. Truthfully, no furniture would work in this space without it being found specifically for it. This living room has a wall of french doors to the right, an empty wall to the left, a wall-to-wall opening in the back to the kitchen, and a fireplace/built-ins in the front. So basically any furniture placement was going to block something.
The deep red formal drapes were very dark and just for show...not actually functioning. And they weren't really their style. Also the dark painting to the right was competing with the TV. The current arrangement was blocking the great french doors, and there was lots of wasted space behind the couch.
So without changing the wall color, we were able to lighten/casual things up quite a bit. This is only half of the room (there's an awesome sectional behind me...but my phone only does so much). Placing a sectional against the left blank wall really freed up the space. There is actually a recliner to the right behind me as well.
We wanted to go with soothing colors so lots of greens, blues, browns, and beiges. I made the drapes with this amazing fabric that I'm pretty sure I bought the remaining lot of on the entire planet. The custom pinstriped side chairs are meant to flank the fireplace and be functional: They have rolling castors and can move around quite easily to face the fireplace if needed.
The pillows are a sea-foamish color, similar to the medallion print rug though it's hard to tell here. They are velvet with satin ends and add a little sophistication. The built-in's are filled with almost entirely items they already had...just staged to showcase each piece.
I promise to have real pics at some point! I am looking at cameras as we speak...there's a good deal going on with THIS one right now. Any input on cameras before I swipe my card?? Suggestions welcome!

Friday, January 13, 2012

Design Work Sneak Peek

I wanted to give you a little look at the office that I am working on. I am hoping to get several before/afters of this house posted soon. I showed you a little bit of the den HERE.

This is a side wall in the office. We needed file storage but also needed a nice furniture piece since this is the first room that you see when you walk in the front door. So I chose this double file cabinet from Ballard. We also needed something to sit over the file storage, and this cotton canvas painting by Hillary Butler was perfect. She tweaked the colors a little to fit our scheme. You can see more of her beautiful pieces HERE. The accessories are all from different places around town, but look great paired together!

Thursday, January 12, 2012

A few New Year's changes

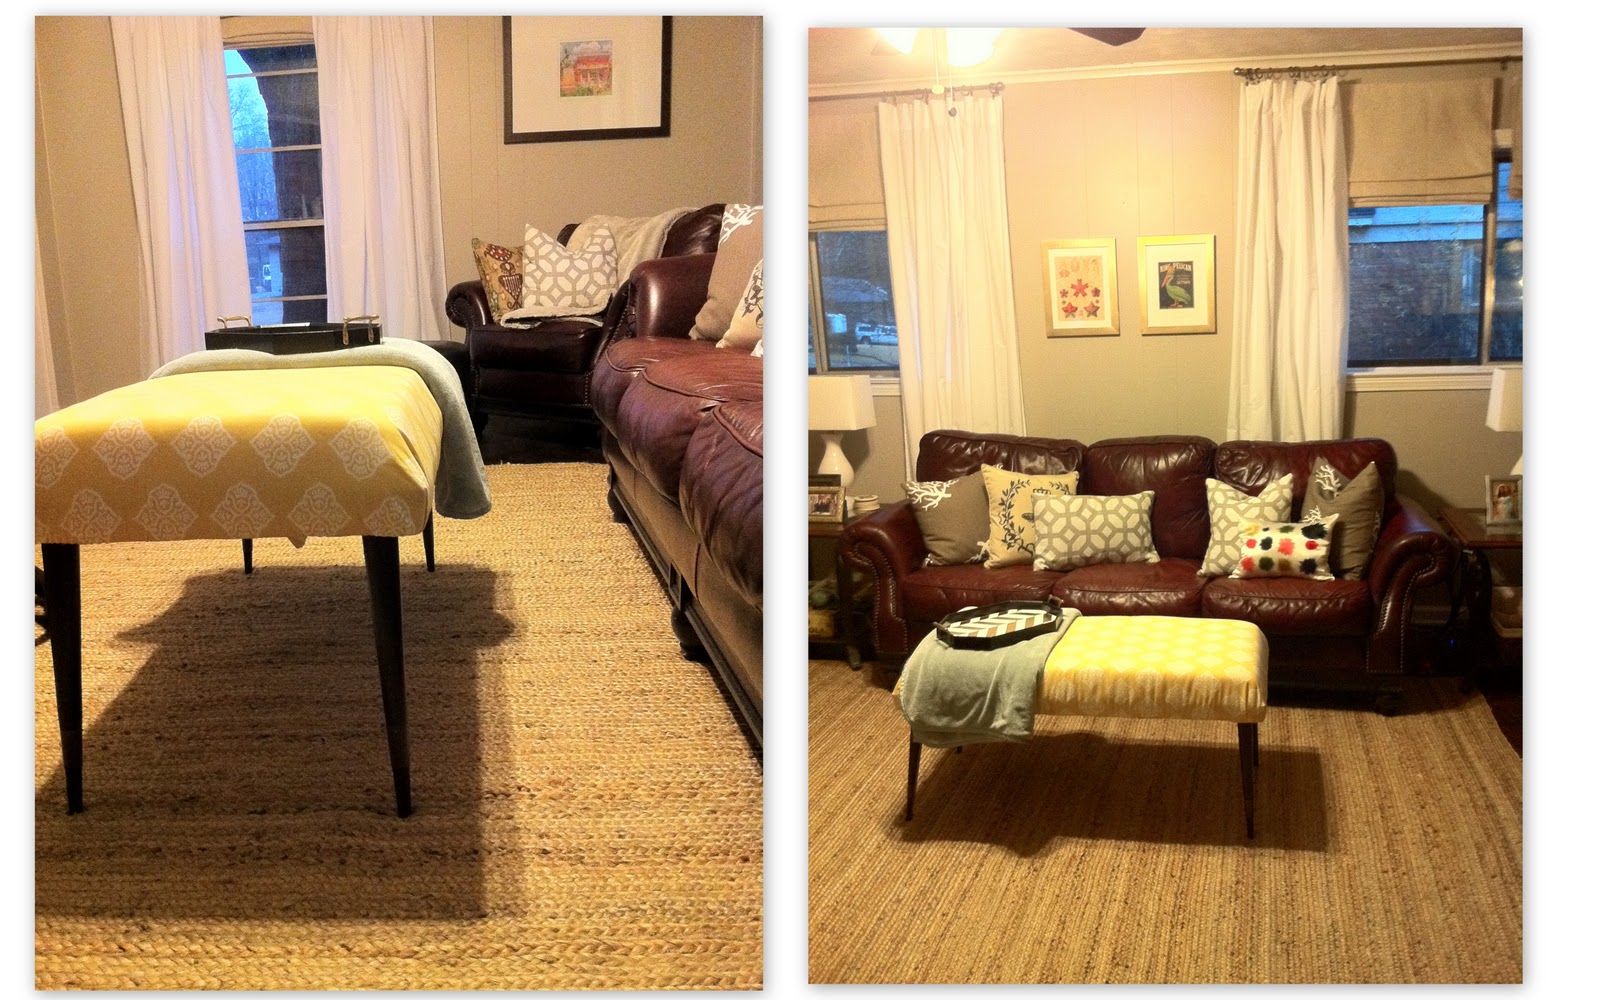
I promised that I would tell you more about my coffee table that is now an ottoman in THIS post about my DIY moss vase fillers. I have also made a few other changes to the den, so I thought I would show you all in one post. I thought it would be fun to take a look at the den and all of the changes it has been through.
 The first pic is how it looked when we bought it, middle is in-progess painting...yes that's me painting. Such a flattering pic. And on the right is after new paint on all of the trim, walls, and refinished floors...they were still wet.
On the left is what it looked like a month or so after moving in...pretty much using what I had. And the right is the den today. I'm sure it will change again before too long!
One change was getting new prints for these frames. I also wanted to paint them...I was tired of the dark. Those ugly comfortable and not-going-anywhere-anytime-soon couches were enough dark.
So I used a little gold spray paint and ordered new prints from THIS etsy shop. They have so many more prints that I want to order! So fun and different!
I love the new look of them and think it brightens up that wall a bit. I also have a few new pillows. The color splotch pillow was on super clearance at West Elm outlet. The bee medallion pillow (it's kind of hidden) was literally like 2 bucks at Dillard's the day after Thanksgiving. I'm trying to not be so OCD symmetrical with everything. Can you tell?
I also like how the frames contrast with the big print over the side chair. Not quite so matchy-matchy. You may also notice a bigger change...a new rug, and my ottoman.
Oh, and those shades in the windows...mini-blinds with fabric glued to them. No joke. Look on Pinterist for a good tutorial. It is SO easy and inexpensive.
This rug was such a steal! It is actually two seagrass 5x7 rugs from TJ Maxx that were $49.99 each! I had some heavy-duty thread in the same color, so I literally just stitched two sides of it together. Because of the pattern of the rug, you really can't tell! You can't beat $100 for a 7x10 rug.
And as for the ottoman, I apologize for not taking pics of the process, but I got carried away. But all I used were 3 large foam squares that I placed on top, wrapped it in batting that I stapled to the bottom, and then wrapped it again in a fabric I picked up a few weeks ago. I am probably going to get new, sturdier legs...maybe a spindle leg painted gold...we'll see.

Friday, January 6, 2012

DIY Decorative Moss Vase Filler.

I don't know if that's the technical term for them, but Moss Balls was the only other name I could come up with...sorry if that sounds a little awkward :)
I needed something to fill the glass cake dome that is currently in my built-ins, and I didn't want to pay $2-$3 a piece for Mossy balls (OK that just sounds weird, I'm now calling them spheres).
I already had some moss from THIS project and THIS project, but you could pick up a sheet (mine was actually an entire table runner) at Hobby Lobby when they are 50% off or with a coupon from Michaels...it will probably cost you about $5.
I picked up some floral spheres at Hobby Lobby for 50% off. So they were about $2.50 for a package of 6.
Oops...blurry pic. Sorry!
Next I cut the moss into lots of pieces. I wanted each one to fit on the spheres without wrinkling up.
One thing to remember when working with this moss is to have something under your workspace (mine happens to be the floor). This stuff gets everywhere!
I used my hot glue gun to attach the pieces all over the floral foam. It was kind of fun...like putting together a puzzle.
Sorry again for the blurry pic...not sure what was going on there. Maybe too much caffeine for the photographer.
Once all of the pieces are on, you can't even see where any of them match up.
Here they are all happy on top of my ottoman that used to be my coffee table...more on that in another post.
And here they are in their new home! I still have a couple left that I am going to use somewhere else. I'm just not sure where that is yet!

So my cost breakdown:
6 foam spheres: about $2.50 (hobby lobby at 50% off)
Sheet of moss: already had, but used about 1/4 of it so let's say $1.25 ($5 for total sheet at hobby lobby)
Hot glue: already had
So I spent around $3.75 total for 6 moss spheres. As opposed to $16.50 HERE. Anyone notice that PB calls them spheres too.
I think that's a pretty good deal for an hour spent DIY-ing!


Monday, January 2, 2012

DIY Mason Jar Candle sticks

For Christmas, I like to give a lot of homemade gifts to family and friends...I do this because it saves money but also because I feel that it is a lot more thoughtful than some random gift that I found for them last-minute. Christmas is more about the thought than about the commercialized holiday that it has become. I love getting homemade gifts and I think most other people do as well.

This year I wanted to make my mom a couple of those cute "redneck" wine glasses that I have seen at several gift shops. They are a little pricey if you buy them retail, so I decided to make them myself.
Here is a pic of what I'm talking about:
via Stylemepretty.com

It pretty much involves a Mason Jar and a glass candle stick. So I went to the thrift store and picked up a couple of pretty candle sticks. I already had Mason Jars. I also picked up some glass glue.
But, when I got home, I realized the sticks were TOO big for glasses...they ended up being more appropriate for a rapper. This is all I could picture:

Not what I was going for...my mom looks nothing like this and defnitely doesn't need a "Crunk cup".
So I decided to turn them into candle holders instead. They are much more appropriately-sized for candle holding, and now no one will get my mom confused with Lil'-John.

These are the candle sticks that I chose for the project...for the wine glasses, they would need to be 4-5 inches shorter.
First, I picked up this glue that works on glass...it is fairly inexpensive compared to the other glass glues, and worked great!
I applied the glue to the tops of the candle sticks and then centered the jars on top. It dried very quickly and it is super-sturdy.
I took a pic of them after they were dry, and my phone ate it.
But luckily, my mom sent me a couple of pics of what she has done with them so far. They are phone pics so they aren't super-clear, but you get the idea!
She added some glass rocks and a tea light for some color to each one. Cute, huh?
Now do you see how big they would have been as glasses?!
She says she is thinking about tying some twine around the top of each one, which I think will look great! And after looking through Pinterest, I thought I would share some more ideas for these Candle sticks (apparently I'm not the only one that has made them into candle holders as opposed to wine glasses...)
Used as a seasonal decor/candle holder:

Find the post about the two above HERE.

How cute would this be for a kid's party? I love the painted lids and bases:
Find the full post for those HERE.

And another seasonal Idea...this one added knobs to the lids and also painted the bases:
Found HERE
I love using Mason jars in unexpected ways!

Wednesday, December 28, 2011

Thrift Store Tray Makeover

I found a great little wooden tray at the new Goodwill here in Memphis a couple of weeks ago. The wood wasn't in the best shape but I loved the brassy gold handles and thought it had lots of potential.
Here is it after I picked it up for only $2.99.

I decided that I wanted to turn it into a chic piece to sit on an ottoman, and I wanted to accent the gold in the handles. I decided on a herringbone-type pattern and got to work. I gathered some black, white, and gold spray paint from the garage, some painter's tape, and some scrap paper and envelopes.
First, I taped off the center and handles, and gave the sides (both inside and out) a couple of coats of glossy black spray paint.
Next, I taped off the sides that I painted black, and used some acrylic white paint for the inside. I started with spray paint, but with the bad shape the wood was in, I wasn't getting enough coverage. Two coats of this acrylic did the trick!
 I then decided to do one row at a time. I taped off each line with painters tape, and used a piece of painters tape in between each to get the spacing right. You could also used a ruler, but this worked just fine! I then went to work with my gold spray paint to create the herringbone detail.
After spraying the first row and letting it dry, I taped off the second row, going in the opposite direction. The main thing to remember is to make sure the gold is only getting on the taped off areas and nowhere else.
 Here is what it looked like after painting the last row. I used Rust-oleum metallic finish in gold.
And here is my tray after! Hopefully this gives you a better idea of how I taped it off. Everywhere in white is where the painters tape was. I used one long strip down the side of each row to get a nice straight line in between each. It took about 2 hours total.
 Here is another view from the top. It is not 100% perfect, but I think that adds to the charm.
I threw a few accessories on top to give you an idea of how cute it looks all accessorized-up! Before really using it, I plan to spray a protective coat or two on top to keep the paint from chipping or getting damaged by glasses or whatever else it might end up holding.
Not bad for $2.99 + paint and supplies that I already had! It turned out exactly how I had hoped and I can't wait to use it!!

Wednesday, December 14, 2011

DIY Easy and Personalized Name Banner

I created this banner for a friend's baby shower this Summer, and began a post on it, but for some reason never finished it. I thought I would share it now. Just because it's Christmas doesn't mean I have to post about a Christmas DIY, right?
First, I picked up several scrapbook sheets from Hobby Lobby. These are usually between 25-50 cents a piece, and are regularly 40-50% off. I just stuck with a certain color scheme.
Next I used some brown construction paper I had in my craft bin and used a plastic cup to trace circles. I wanted to use these on each triangle of the banner to be a background for the letters for the baby's name.
I then cut out enough triangles for each letter of the name, plus a couple of extra to make sure that the banner was long enough. If the baby has a fairly long name, you wouldn't have to cut extras.


I had these left-over blue letters also in my craft bin from a project a couple of years back. I also used them for another decoration for the same shower. You can see the scrap fabric wreath I made HERE.
I then laid everything out to make sure it was turning out how I wanted. I had picked up a couple of painted wood characters at Hobby Lobby while I was there since I knew that 4 triangles weren't going to be enough. I thought the little alien and space ship were cute but not too cheesy or "baby". Once I had it looking how I wanted, I used craft glue to glue each layer of the banner. So simple!!
I also picked up some jute string at Hobby Lobby and some mini clothespins. I can't tell you how many other projects I have used that string for since.  Totally worth the couple of bucks!
I measured out the string the length that I needed it, and then used 2 pins on each triangle, securing them to the string. I then just used painters tape which I hid under my lamps to secure the banner.
I think I probably spent a total of 7 dollars for this project. And I had so many left-overs of the supplies, that I have been able to use it all for other projects here and there. I loved how it turned out and it helped personalize the shower in a cute way!!


Related Posts Plugin for WordPress, Blogger...