Showing posts with label Party Decor. Show all posts

Monday, October 8, 2012

Vintage Bridal Shower With A Southern Touch

I enjoy planning parties as much as I do staging and decorating, so I was thrilled to have the opportunity to help with my cousin's bridal shower for her upcoming wedding!
We decided on a traditional brunch and thought finger foods would be best. Finger foods can be fancy though! This was a shower for family and a few lifelong family friends, so we kept it casual and elegant.

 We stayed simple with all white serving pieces and used my milk glass for the roses. I grouped several vases together to make one long centerpiece (always check the grocery store for their "manager's special" flowers...this usually yeilds some great deals on other wise expensive bouqets!).
 We went with 2 sweets and 2 salty snacks for a good combo. Below were glazed doughnut muffins and Paula Dean's lemon blossoms that were both super-yummy!
 For salty we went with cheesy sausage min-muffins and mini-mushroom-and-sausage quiches. It always is nice to label dishes like this in case someone is allergic to a particular food or doesn't like something (Just a piece of card stock and a piece of scrapbook paper is all you need).
 We also went a little non-traditional with the fruit and made mini fruit parfaits with whipped cream or on skewers so people could take their pick.
 My friend Susan did an amazing job with the doily cookies!
 They were the perfect touch and were exactly what I wanted! If you are in the Jackson, MS area you MUST check her out if you need any kind of bakery treat!
We used Oma's old doilys as a table runner.
 We also used a mixture of all of Oma's old china that had been passed down several generations. For utensils I used wooden forks and wrapped them in napkins and twine with a free printable I found online that said "bon appetit". VERY simple but makes a big impact!
 We served a simple punch and used mason jars and striped paper napkins. This cart made the perfect drink station away from the main table.
 We set up a coffee station in another room to keep guests moving (since the house is not that big). This was also where we opened gifts so it kept things flowing. We used Oma's old china for the coffee as well.
 We set up a gift station near the coffee.
 I framed one of the shower invites and used it when decorating. This is an easy way to personlize decor!
 I also set up a place for everyone to leave the bride "helpful household tips" that she can use! These ladies had years of wisdom and her tips were great! I bought simple cards and printed tape to personalize them. All they had to do was write a quick note and toss them in the basket.
 It was a fun morning. Here are a few pics of everyone enjoying the day and celebrating the bride to be! We hosted this in my parent's house, which I talked about a lot this Summer. You can see it's progression HERE.
 
Me and the bride.
(PS, this wreath is for sale in my Etsy shop)
 Moms, grandmothers, aunts, and cousins.

Sources: Wooden forks, paper straws, "Mr. and Mrs. decorative tags all found HERE. Very reasonable and highly recommended!

Wednesday, December 14, 2011

DIY Easy and Personalized Name Banner

I created this banner for a friend's baby shower this Summer, and began a post on it, but for some reason never finished it. I thought I would share it now. Just because it's Christmas doesn't mean I have to post about a Christmas DIY, right?
First, I picked up several scrapbook sheets from Hobby Lobby. These are usually between 25-50 cents a piece, and are regularly 40-50% off. I just stuck with a certain color scheme.
Next I used some brown construction paper I had in my craft bin and used a plastic cup to trace circles. I wanted to use these on each triangle of the banner to be a background for the letters for the baby's name.
I then cut out enough triangles for each letter of the name, plus a couple of extra to make sure that the banner was long enough. If the baby has a fairly long name, you wouldn't have to cut extras.


I had these left-over blue letters also in my craft bin from a project a couple of years back. I also used them for another decoration for the same shower. You can see the scrap fabric wreath I made HERE.
I then laid everything out to make sure it was turning out how I wanted. I had picked up a couple of painted wood characters at Hobby Lobby while I was there since I knew that 4 triangles weren't going to be enough. I thought the little alien and space ship were cute but not too cheesy or "baby". Once I had it looking how I wanted, I used craft glue to glue each layer of the banner. So simple!!
I also picked up some jute string at Hobby Lobby and some mini clothespins. I can't tell you how many other projects I have used that string for since.  Totally worth the couple of bucks!
I measured out the string the length that I needed it, and then used 2 pins on each triangle, securing them to the string. I then just used painters tape which I hid under my lamps to secure the banner.
I think I probably spent a total of 7 dollars for this project. And I had so many left-overs of the supplies, that I have been able to use it all for other projects here and there. I loved how it turned out and it helped personalize the shower in a cute way!!


Wednesday, August 24, 2011

Fabric Scrap Wreath!

I have been saving links to fabric scrap wreaths as an idea for a holiday party or a shower, so when I finally got to make this myself, I was really excited!
The links that gave me the idea for this can be found HERE or HERE.

I decided that I wanted my wreath to be pretty full, so one coat hanger folded into a circle wasn't going to be enough. I went to Hobby Lobby and found a wire wreath form. None of them were super-wide, so I decided to get two sizes and find a way to connect them. These are only a couple of dollars a piece.
Here they are together. This was exactly the width that I wanted.
I also picked up this inexpensive floral wire which was right beside the wire forms. And it's amazing. It has a cutter so no pliers needed! I'm sure everyone else already knew about this nifty invention. Anyway, I just wired the wreaths together at 4 points and it seemed pretty secure, so I left it at that.
Next, I went through my fabric scrap pile and pulled out all of the colors that we were using for the shower. The great thing about this is that these are the colors that I have used all over my house!
Next, I cut TONS of fabric strips around 6-8 inches long and about an inch wide. I didn't measure or anything, so none of them are exactly the same, but it doesn't matter once you attach them. The cutting and the tying take a little while, but just do it while you're watching your favorite show, and it will go by fast! To attach the fabric, I just tied each piece to a place on the wire form in a knot, with equal parts of fabric on each side of the knot.
This is what it looked like about half-way through. There was really no pattern to how I tied them, just tried to fill in gaps where I saw them.
Here is the wreath after a couple of hours of tying lots of knots!! I wanted to personalize it so I dug around in my craft supply and found some blue letters that I had from another project.
I used tacky glue to glue the letters directly to the wreath. I just pressed each one down for about a minute, and after about half an hour, they weren't going anywhere!
I knew we would be opening gifts in front of my TV, but I didn't want a big ugly TV to be our background, so I thought the wreath did a nice job of distracting! I was so busy that day that I completely forgot to get a closer picture of it!
Here's a little closer look of how it was displayed. I just used a white ribbon that I already had and looped it around the wreath. Then I used a thumb tack to pin it to the top of the shelf. I left a little ribbon on top to tie a bow to cover the tack.
This is something they can re-use as well either at the hospital or in his room!


Monday, August 22, 2011

DIY Tissue Paper Puffs

Tissue paper puffs are an easy way to add lots of color to a space for a shower or party. They are pretty easy to make, all you need is tissue paper in whatever colors you're planning on using, floral wire, scissors, and something to hang them with (I used fishing line).
You need 8-10 sheets of paper per puff.
First you lay out the papers on a flat surface, all stacked on top of one another.
Yes, that's a dog bone...I block these things out.
Next, you fold the paper back and forth, in about one inch folds like an accordian. Kind of like how you would make a fan when you were a kid.
Once you have folded the paper all the way up, find the middle, and cut a piece of floral wire. Wrap the wire around the middle and make sure it is pretty tight. If you want a smaller puff, you can cut your tissue paper in half long-ways. This will make the puff half the size.
After you have secured the wire, use your scissors to shape the edges. You can cut them to a point or leave them rounded. Just make sure that the ends are symmetrical.
I was doing this by myself, so I didn't get a picture of the last step, but HERE is one from Marthastewart.com, along with a tutorial (that I found after I made mine!).
At this point, before you pull the sheets apart, go ahead and tie your fishing line around the center (this will make it easier to find once the puff is full).
Pull each sheet of paper apart from the others, separating them one at a time. Be careful not to rip the paper when you do this!

Once you are finished, trim your fishing line to whatever length you need it, and hang it from the ceiling, a light fixture, etc...
Here is the finished product:
I used several colors and made both large and small ones to add layers.
This took care of the space in front of the window without having a large floral arrangement to get in the way! I secured these to the curtain rod. They are really light so I didn't have to worry about them weighing anything down.
Here's a closer look

These are really fun to make and I love how inexpensive they were!

Wednesday, August 17, 2011

DIY cupcake stand

I mentioned on Monday that I would be posting soon about the baby shower that I recently hosted at my house. I am actually going to make it several posts because there were lots DIY projects involved there and I was asked how several things were created, so I thought I would showcase them one at a time.
But first, I wanted to show you my solution to displaying 40 cupcakes on a small table. I knew I needed some kind of tiered stand, but I didn't want to buy anything new just for one night. So I went through my collection of serving pieces and found 3 that I thought might work.
 This is a cake stand that I found at a garage sale, an awesome cake stand that flips over and becomes a dip tray that I received as a gift years ago, and a serving plate that I found on final sale at Pottery Barn outlet!
I tried this arrangement of stacking them and then tested it out to make sure my cupcakes would fit on each tier. It worked perfectly!
And here it is with all of the cupcakes! I was so happy that everything worked perfectly!
Here's a closer look.
So if you don't think you have the perfect serving piece, take a quick look through what you have on hand and see it you can make it work!
Next up, how to create those cute tissue paper puffs! They are such an easy way to add lots of color!

Monday, February 21, 2011

DIY Valentines Dinner

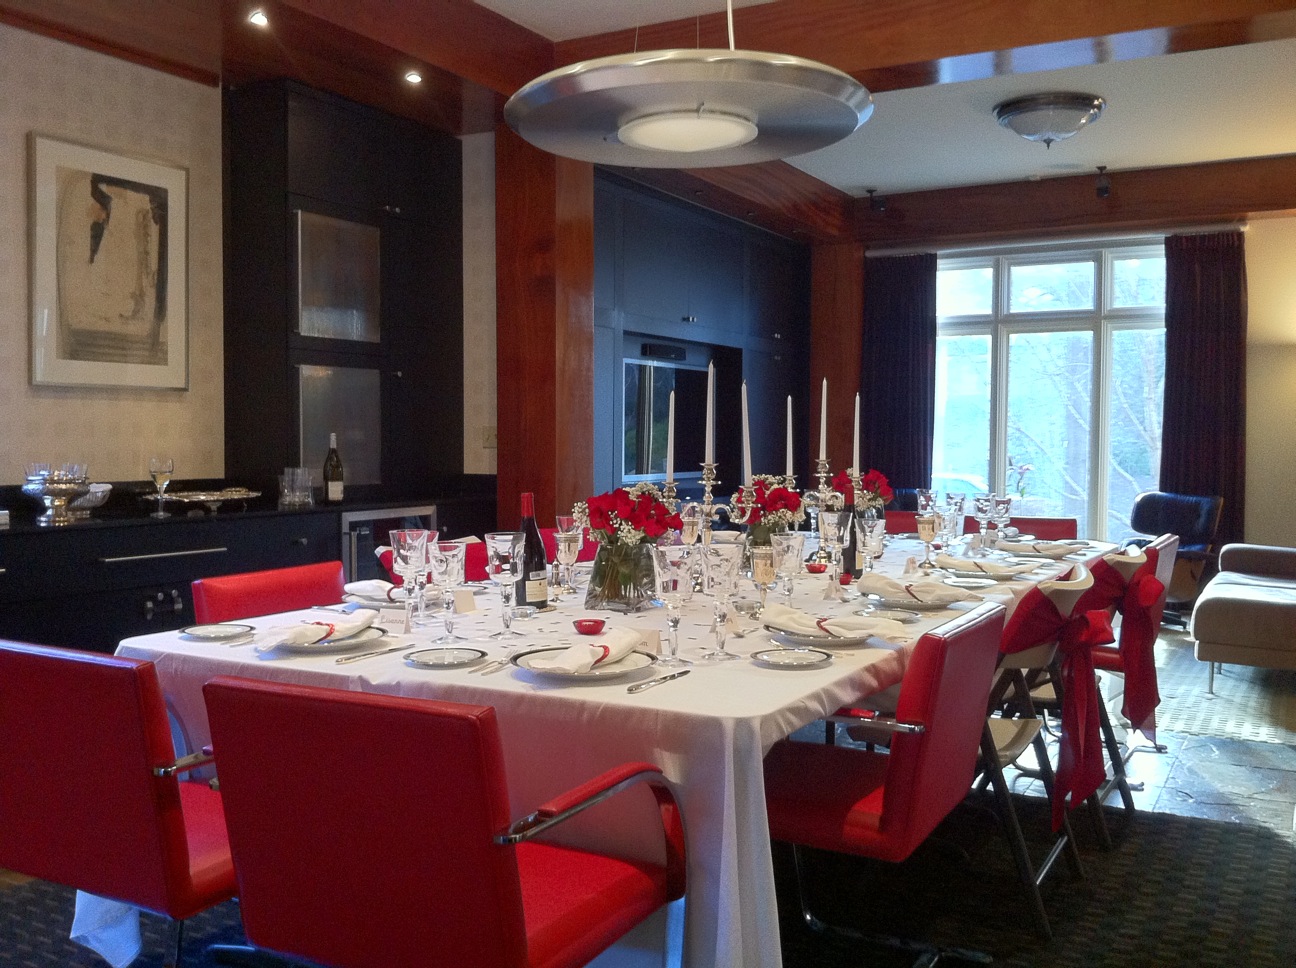
Last week, I was asked to help stage/decorate a table for a Valentines dinner for 12.  The host wanted a party that was elegant but kind of whimsical at the same time...just not taking the holiday TOO seriously.  So we went to work on some ideas and I wanted to share a few of them with you as well as the final result.  We were really just focusing on the table area as the rest of the house sort of speaks for itself.
For place cards, we bought blank folded cards and scrapbooking letters in a pink sparkle finish.  These were only a couple of dollars a set at Michaels, and worked perfectly.
Here is one of the placecards...so easy!  For the flowers, we used simple inexpensive glass vases and lined 3 of them up along the table.  The roses came in bunches of a dozen, and I used two dozen for each arrangement.  I simply cut the stems to size and added filler where needed.  Much less expensive than ordering them from a florist (and belive me, I am NOT a florist!).  Here is a better shot of one of my arrangements:

For napkin rings, we wanted to bring in the whimsical idea, so at Michaes we found sparkly heart "ornaments" (I guess for someone decorating their Valentines tree??  I have no idea).  I just cut the string off and had instant napkin rings for 50c a piece!
I placed inexpensive red and clear votive holders around the table to add some color and mood lighting.  I scattered some fun XOXO confetti around the table as well to make sure we weren't getting too serious.
The host had red dining chairs to start with, so that was great for the occasion, but her dining table did not fit 12 (who's does?).  So, four folding tables and four plain white table cloths did the trick!  Who would know?!  We had to use four folding chairs to accomodate for the crowd, and I tied red sashes on those chairs so they wouldn't be such sore thumbs...I think it turned out pretty well.
The final touches were the host's own beautiful china and silver pieces as well as two amazing silver candelabras to sit in between the arrangements of roses.  The final result was stunning!
This just goes to show that a little creativity and some DIY skills go a long way!
I also even found a use for the left-over greenery from the rose bouqets.  We turned it into a simple but elegant arrangement on a side table.
The party was a huge success and everyone loved how great the house looked!  Hopefully this will inspire you to throw some fun DIY parties of your own! 
Related Posts Plugin for WordPress, Blogger...